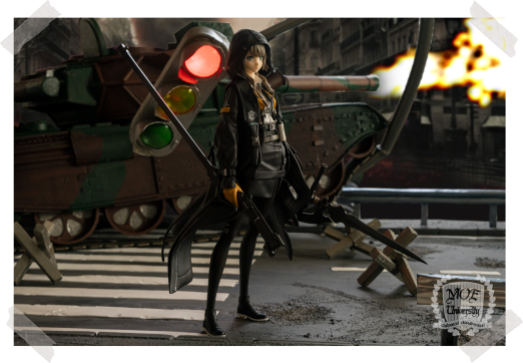
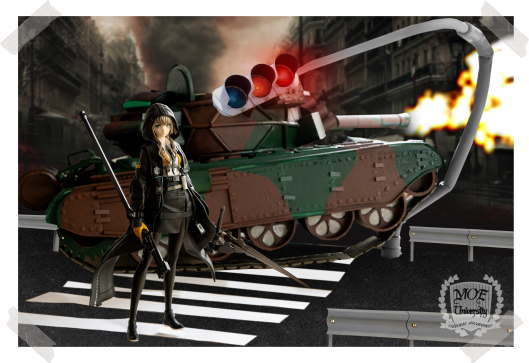
“If the props succeed, the figure photo follows.”
Since I don’t know this character or the source material (if there even is one), I had to think of some fitting scenery on my own. And you know the old saying, “When in doubt just deploy a tank”.
About the figure:
This figure from Chinese manufacturer Myethos was released in mid-2022 and is part of an ever-growing line of A-Z: characters, that are originally drawn as an illustration by character designer neco. Before I made this photo, I already did a video review for [D] and therefore I will keep this section brief.
In my opinion Myethos made some really big improvements in regards to quality and also their presentation of figures is topnotch. The slight militaristic or post-apocalyptic wardrobe of those A-Z: characters might or might not be your cup of tea, but nobody can’t deny that, for a figure released in 2022, where prices are through the roof, you get a great model that is also very tall and has a themed base. The MSRP was just shy under 13k yen and I’m already see her selling at discounts on certain websites.
About the series:
As mentioned in the beginning I’m not really familiar with this figures origin, but I do like the style of the artist and this line of characters was on my radar since the release of [S] in 2020. Despite my previous portfolio of figure photos I also enjoy mechanized and militaristic figures such as Frame Arms Girl or the much older Mecha Musume titles like Strike Witches or Busou Shinki. Not to mention that, before I did figure photos, I had a model train and before I had a model train, I built a few plastic models of fighter jets and tanks. And also that I played Girls Frontline for a while and really enjoyed it – well, guess I’m a boy after all and boys love their (war) toys.

Speaking of GF, they finally announced a few figures where you can get the main-cast in their original outfits and not those pure fan-service gatcha costumes. So, keep your eyes open, because this might not be the last battlefield themed photo I’ve ever made.
Thoughts about the picture:
Since I wanted to have an in-scale tank for the background I started to research if there are any pre-build kits available but the only ones that would come close to this size are RC ones and those can get pricy. Building the tank from scratch was an interesting experience since it deviated quite a bit from the things I usually have to craft for my photos.

I started with gluing some empty parcel-tape rolls to a chuck of cardboard and it took a few construction steps until I was convinced that this first attempt would really yield some results. Luckily, since I build a few model tanks (the plastic ones with the normal scale) in my youth, I knew what the basic structure of such a vehicle was. All I had to do, to make a bigger one, was too upscale some of the blueprints that can be freely downloaded from model kit companies.

Once I had the basic structure ready, I simply added a few more details, made from different kinds of cardboard to the outer shell. After that I decided to spray-paint the first layer of color because of the complexity of the surface. Painting the tank went surprisingly well, even though it emptied two whole 400ml cans for the base coat alone. It’s amazing to see how convincing it looked once everything had the same color and the cardboard finish disappeared. The tracks and the camouflage were painted by brush afterwards. I could have added more details and/or inscriptions but I felt it would have been a waste of time to further decorate, what is ultimately a background prop for a gloomy night shoot.

But the tank wasn’t the only big prop I had to craft for this picture. The second main component is the traffic light that was run over by the armored vehicle. I took some PVC pipes and melted them into shape and made a horizontal version of a traffic light out of cardboard. The traffic light seams big but I pulled up some real life measurements for those and they are surprisingly tall. The red one really works, and I used some LEGO canopies for the light bulbs.

Finally, I had to make a baseplate that fits both the figure and the tank, while providing enough free space to look convincing. Building it wasn’t that cumbersome, but I always have to overcome myself when it comes to weathering. Basically, you build a clean version of something only to damage and re-paint it afterwards. Because of its size, the street section with the crosswalk also took a fair amount of time to paint. Once everything was finished, I tried a quick mockup from the composition, and it didn’t really look convincing at all. I knew that if this was going to look good, I have to do some serious legwork with the lighting and some elemental effects. I decided to shoot the whole scenery outside at night and added some flash fire from a spray can (kids, don’t try this at home) onto the muzzle of the barrel. In addition to all of that I also used colored LEDs, a strope-light and my fog machine. Basically, I throw everything into the mix, in the hope that the result would look half decent.
After a few touchups on the PC the picture turned out pretty well. Not my best work for sure but also not the total disaster that I was afraid of. I’m also glad to have finally done it because now I can store away (aka trash) those huge ass props and move on to new things

Sony Alpha 7R II, 16-35mm Canon lens / ISO 100 /exposure time 2 sec. /aperture: f/9.0

Time and effort: Even though the tank was realized with the first draft all the massive surfaces took forever to paint and dry out. Also, the shooting of this picture got delayed a couple weeks due to family affairs.

Costs of the props: Since the whole tank is made out of cardboard, and I have free access to such basic materials, this set did cost me next to nothing. I only had to buy two green spray cans and a plastic pipe for like fifteen bucks.


[…] I had to wait for good shooting conditions outside to finish off my previous project, I already started working on the props for this one. For some reason I had the strong urge to […]
LikeLike